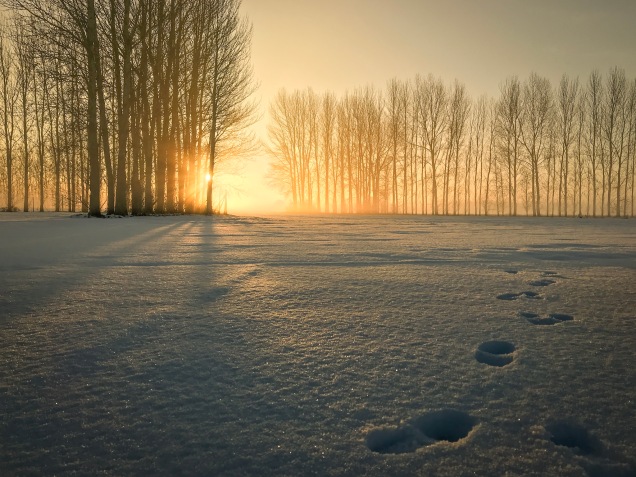
They say the best camera is the one that’s with you and that was certainly true Tuesday morning as I drove along admiring the morning light, looking for the best place to pull over only to realise with a sinking feeling that I had forgotten to put my camera gear in the car. For a few moments I was gutted, knowing that we don’t get snow very often and that by the time I drove home and got my stuff the light would be gone, I littered the car with profanities.
But then, as I took one last look at the scene I was about to miss capturing, I considered it further. More specifically I considered the fact that I had an iPhone 7 plus beside me and that the main draw back of camera phones is their inability to deal with the extremes of light and shadow that most landscape scenes render. In most landscape scenes the land will be much darker than the sky and that will generally warrant the use of a filter or bracketing of shots ready for merging later. This is something that is just not possible with even the best phone cameras, but in front of me was not a scene of contrasts, it was a scene of beautiful even light. Could the phone handle it? I mean, properly handle it. Not a snap that I show to a few people on my phone, I mean a shot that I can upload to my website and sell prints of. There was only one way to find out.
I parked the car and hoped over a gate to survey the scene. I felt that it was very likely that due to the even lighting the iphone could expose the shot of but what about the sun poking through the trees, what would it do with that? Traditionally when using a “proper” camera the technique in such scenarios is to stop down the aperture to create a bit of starburst but controlling the aperture is not possible on the iphone. How would it handle this? Even my best lenses struggle to not create artifacts, would a phone really be able to handle it? Well, in my opinion not only did it handle it but it excelled. Don’t get me wrong, I’m not about to sell all my Olympus gear and become an iphone photographer. This was a unique set of circumstances that the phone could handle, they tend to be few and far between. But, it does go to show that if the scene is pretty evenly lit phones have advanced enough to make a shot worthwhile and at 3958 x 2968px it should even print pretty well at a reasonable size.
Anyone who follows my photography should know that I am not really a backpack kind of guy. The reason I shoot with Olympus Micro Four Thirds equipment is because I want to travel as light as possible and whenever possible remove the need for a backpack. Instead of a backpack I use the Cosyspeed Camslinger system. This is great when I’m not going far from the car and I can carry my tripod in my hand, but what about when hiking?
My quest for a backpack started squarely with the ability to carry my tripod with the weight evenly distributed
I have to be honest, my search for a backpack started from the premise of wanting to be able to easily carry my tripod on my back and I searched around for some kind of dedicated tripod holder that simply held the tripod and distributed the weight evenly across my shoulders. I could find nothing online and after a fruitless day searching at The Photography Show last March I found myself chatting once again to Mark Hoskins on the Benro stand. Now, it’s no secret that I use and love the Benro Travel Angel tripod (see review) so I asked Mark if they did anything that matched my requirements. “I’m afraid not”, he said. “Well”, I replied, “I’d be happy to go for a small bag, as long as it’s light and the tripod is carried in the centre and not on the side!”. Why do bag manufacturers do that? Are they trying to cause the user back problems? Do Manfrotto and Lowepro own shares in a global chiropractors? To me it’s simple, the weight of a backpack should be distributed evenly and it can’t be if they force you to shove a 2kg lump of carbon fibre on one side!
Mark listened to my rantings and then gently led me to their new backpack range display where he handed me the Ranger 200. That was 6 months ago and I have been using the backpack regularly ever since, so what’s my verdict?
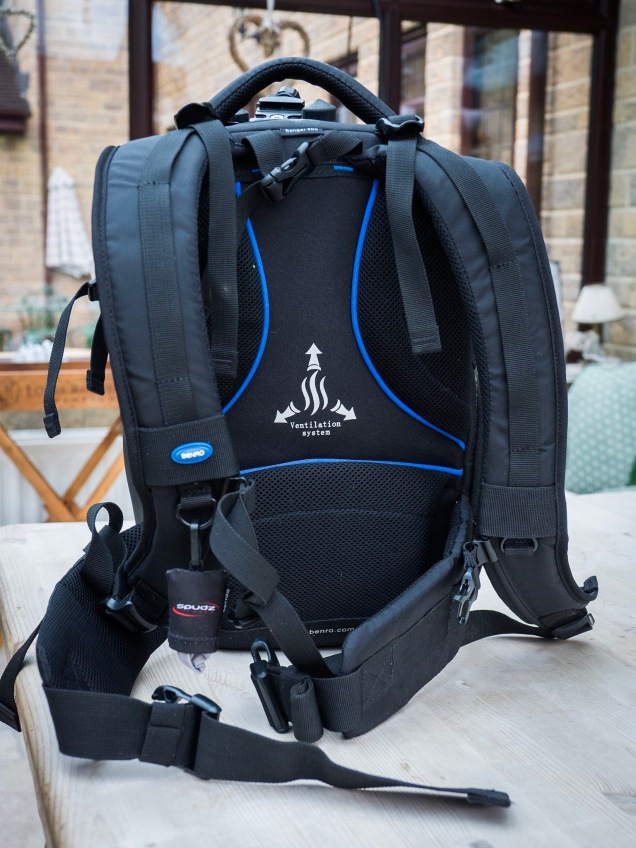
The Ranger 200’s airflow system does a pretty good job of keeping the sweat off your back whilst the cross straps keep it securely on there.
Qauality
Before we get into the nitty gritty of whether the bag is actually any good or not let’s address the quality. At £129 it’s not the cheapest backpack on the market but then it’s not the most expensive either and the quality certainly lives up to the price tag. It is manufactured from water-repellent nylon with soft lined internal compartments. The dividers inside are adjustable and Benro describe the zips as “durable” which I have found over 6 months use to be true. I have mistreated the bag quite badly since I received it and apart from being a little grubby it is still as it was the day I bought it. In short, the quality is superb.
Fitting It All In
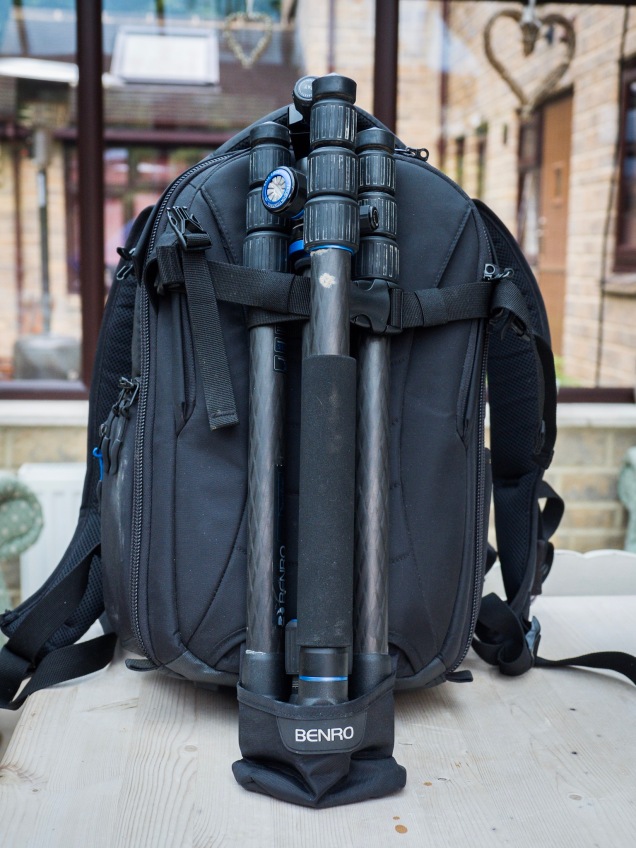
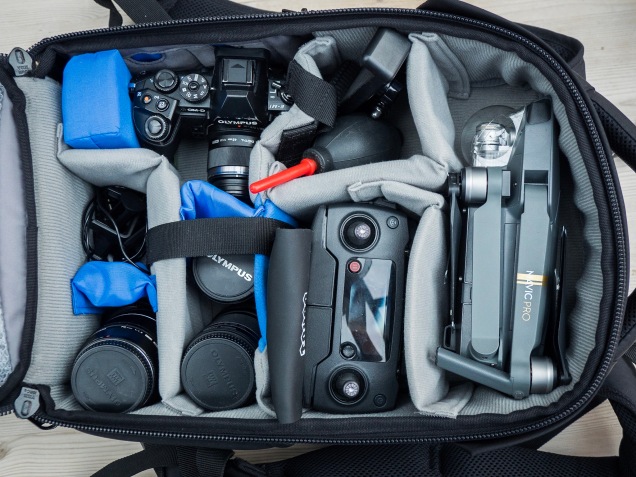
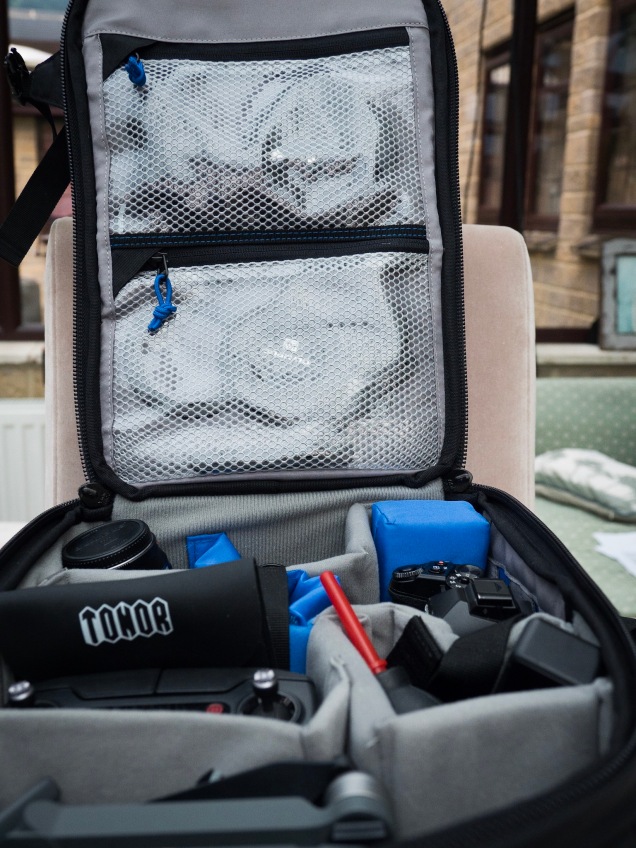
The Ranger 200 is small and lightweight but really packs a punch in it’s carrying capacity. Weighing just 1.4kg it’s exterior dimensions are 27 x 46 x 32 (W x H x D) cm. This gives a really good carrying capacity, even for DSLR users, and as can be seen below I have managed to pack a lot in, including a spare Olympus E-M1 body with lens attached, spare lenses and my Mavic Pro with 2 spare batteries. There are 2 interior zip-close storage compartments for all those little things such as batteries, cables, etc that just don’t fit anywhere else.
Despite being a pretty compact and lightweight backpack the Ranger 200 can still hold a spare body and lenses as well as a Mavic Pro drone and spare batteries, plus much more.
The dividers, which attach to the walls of the interior with Velcro, are of various shapes and sizes and can be configured to suit your individual requirements.
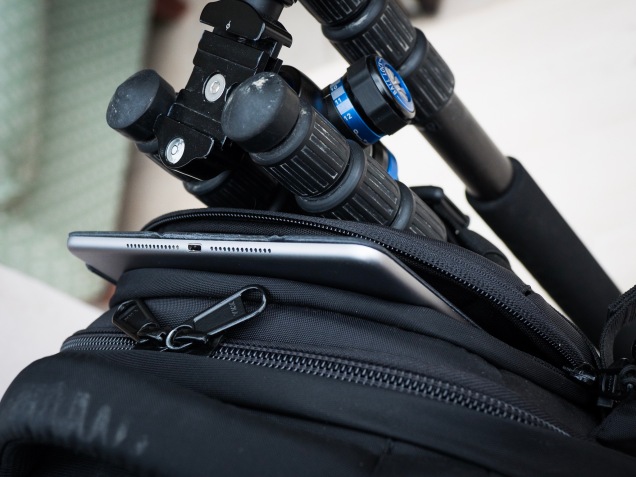
There is also a padded front pocket for a small laptop or iPad. My iPad fits in it beautifully but my 15″ Macbook Pro won’t. This isn’t an issue for me because Lightroom Mobile is now so good that I pretty much do all of my post processing on the iPad and never take my Macbook out of the house. I reckon a 13″ Macbook would probably fit in.
As I do just about all my post processing on my iPad these days the ability to slip that in a pocket on the Ranger 200 is an added bonus.
Externally the tripod is carried (fanfare please) centrally and sits securely in a little pouch that can be tucked away when a tripod is not being carried. An adjustable strap secures the tripod at the top and I can even tuck my drone landing pad in the tripod with no problems.
In Use
The first thing to say about using the bag is that when fully loaded and on your back the weight is distributed extremely evenly. I don’t want to sound like a broken record but this is really important. It’s incredibly bad for your back and shoulders to have unevenly distributed weight. Not only that but your backpack will become less comfortable much more quickly if it is pulling to one side.
The Ranger 200 features a ventilated padded harness system with plenty of adjustment and cross straps to ensure that the harness straps stay securely on your shoulders. I have to say that it all works extremely well and I have found the fully loaded bag to be incredibly comfortable for long periods. Although the Ranger 200 is water-resistent Benro have also included a rain cover.
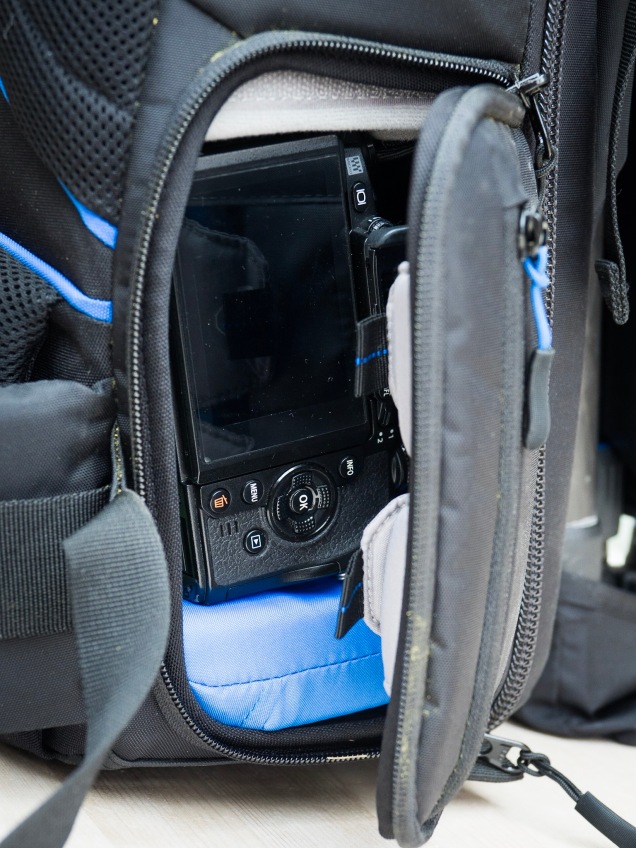
At the bottom of the bag is a water-resistent pad that it sits upright on meaning you don’t need to lay it in the mud every time you take it off. On the right-hand side is a quick access opening to allow you to grab your camera. There are a couple of little pockets inside the flap for SD cards. On the left-hand side there is an open elasticated pocket that will hold a small water bottle or similar.
There are plenty of pockets for storing those bits and bobs that just don’t belong anywhere else
Verdict
All in all the Ranger 200 is a well made, well thought out backpack that I am extremely happy with. I have been very careful to make sure I have really used this backpack and properly put it through it’s paces before reviewing it and now having used it for over 6 months I can definitely say that in my opinion it is well worth the money. It fulfils my criteria but I realise that everyone is different. Is it the right backpack for you? I can’t say but what I can say is it’s definitely worth serious consideration.
Despite carrying my main body round my waist rather than in my backpack I am surprised how often I have accessed my spare through the handy side opening.
There are two things I dislike about landscape photography. Firstly, tripods. These are the bane of my life, a necessary evil that cannot be carried or stored in any satisfactory way. The sooner someone invents a self-levitating camera the better. My second pet hate is backpacks. I have yet to find a backpack that does anything more than hang on my back, feeling uncomfortable, making me sweat, and being a complete pain in the arse every time I have the audacity to actually use my camera gear. You cannot work with a backpack, you fight against it. You hike for miles with it weighing you down and then you finally see the shot that you want. At this point you begin the laborious task of contorting yourself into various bizarre shapes to extricate it from your back, laying it on the wet and muddy ground, and then rifling through endless pointless pockets and compartments to remove the required body, lens, filters, etc that you require to take the shot. By this time the gorgeous light that bathed the valley ahead has gone behind the mother of all clouds so you decide to pack it all away again and press on. After another 5 minutes of faffing you pick the backpack up, clean off as much of mother nature’s feculence as you can and swing it over your shoulder ready to begin the muscle tearing process of getting it onto your back. It’s at this point you hear a sickening thud. “What was that?”. Your blood runs cold. “Not a lens, please don’t be a lens”. With trepidation you slowly turn to take a look. “Bollocks!!!!”. It was a lens. In your haste to actually get on with the rest of your life you have left one of those myriad of compartments open and your prized glass has flown out and hit the only rock with 25 miles.
This for me is the reality of using a backpack. A backpack doesn’t aid my photography in any way, quite the opposite, it hinders it. And don’t even get me started on the prospects of being able to shoot spontaneously whilst hiking as this entails either having a strap around your neck or simply holding the camera in your hand, neither of which sit very well with long hikes, scrambling over rocks, crossing slippery stones, or any other treacherous undertaking you might perform whilst out and about. In my opinion backpacks were sent by Beelzebub himself to hinder photography and make photographers sweat and ache. I have not found a well designed one yet.
It was with all this in mind that I found myself wandering amongst the stands at the photography show back in March, searching for some kind of alternative, when I happened upon a stand manned by a friendly chap named Thomas. It turned out that Thomas was the founder of Cosyspeed and he proceeded to enthusiastically demonstrate their Camslinger system to me. I could immediately see the potential for street photographers, after all they have a Thomas Leuthard signature model and you don’t get a better street photography related endorsement than that. But I am predominantly a landscape photographer, I have to carry more gear, could it really be any good for me? There was only one way to find out and that was to acquire one. So, about a month later I received a parcel containing the following:
1 X Camslinger 160
1 X Camstrap 10
1 X Camslinger Lensbag 80
1 X Camslinger Stuffbag 30
So, 2 months on, what’s it like?
Well, it’s great, it really is. I think the most flattering thing I can say about it is it helps me do photography rather than hindering me. It not only acts as a carrying aid but also as a work bench. No more putting a backpack on the floor and working from that, it just stays around my waist the whole time. When I’m walking, when I’m cycling, and when I’m actually shooting. Every thing is there within easy reach.
The Camslinger system puts your camera within easy reach for quick access.
My Setup
As mentioned above I have the Camslinger 160 and 2 smaller companion bags. As well as this I have a Lee Filter Pouch that also attaches to the belt. I have the Camslinger 160 on my right hip, the Lee pouch on my left hip and the other 2 bags behind me. “So what about your tripod?”, I hear you cry. Well, that is the one thing that this system obviously can’t accommodate, so I’ve had to start using a shoulder bag and whilst this isn’t ideal I have found it is a worthwhile compromise.
What’s in the bags?
Well, in the Camslinger 160 I have:
1 X Olympus OMD E-M1
1 X 12-40 f2.8 Pro lens
1 X 75mm f1.8 lens
1 X 45mm f1.8 lens
1 X 9-18mm f4-5.6 lens
The 160 takes 4 lenses and a body…..just. It is width adjustable.
In the Camslinger Stuffbag 30 I have:
3 X spare batteries
Stuff Bag 30 with 3 batteries.
In the Camslinger Lensbag 80 I have:
1 X remote cable release
1 X iPad lightning SD card reader
1 X Cleaning cloth
Several SD cards
Lensbag 80
In the Lee filter pouch:
3 X soft edge graduated ND filters
3 X hard edge graduated ND filters
1 X circular polariser
1 X circular variable ND filter
1 X Hi-tech 10 stop filter
1 X Lee Foundation kit holder
4 X step up rings
Is it comfortable?
Well, after extensive testing the answer for me is a resounding, yes. It does take some getting used to as it seems extremely counter intuitive at first but once you get used to that you don’t really notice it even on a fairly long walk. You can simply swing everything behind you or keep the Camslinger to your side for quick and easy access. Even hiking between locations you should never miss a shot as you can go from bag to shooting in a matter of seconds.
It’s easy to swing everything round behind you for walking / cycling
On a bike it’s great. I’ve never felt comfortable with a backpack, I find it makes me sweat too much. I’ve tried handlebar bags but that just makes the bike handle badly. In my opinion you certainly notice it much less than a backpack but if you are undertaking a self-supported tour and need to carry clothes, etc than it leaves you the option of a backpack as well to carry that stuff rather than your photography gear.
What is it like to use?
Brilliant! This is where the Camslinger system comes into it’s own. It’s like having a photographic work bench around your waist. Everything is at hand and easy to access, no more turning round, bending down and rifling through a backpack on the floor just to change a filter or lens, it’s all there, ready to go. It’s difficult to put into words how good it is so I have made this video in the hope that will get it across.
Note: It turns out that Cosyspeed like this video so much they have given me a discount code. So if anyone feels inspired to get themselves a Camslinger just use street316 at http://www.cosyspeedshop.de to get 10% off.
The quality and construction appears to be second to none and the double fastening system gives you confidence that you won’t lose your gear. It also comes with a waterproof cover that hangs off the bottom and can be put on in seconds as well as a pretty clever system that allows you to adjust the size. You can see more on this at http://www.cosyspeed.com
Any drawbacks?
After using the system for 2 months I have only found a couple of small problems and these really only apply to me. Firstly it’s just a little too small for the gear I carry. This is not the fault of the bag of course, indeed it is testament to it that I can carry so much, but for me it would be great if it was just a few mm taller so that it could take the E-M1 fitted with a 12-40 Pro lens just a little easier. The only other thing is that the Velcro on the lens bag seems a little weak. I can fit the 75mm f1.8 lens in but it has a habit of forcing the top open. It is fine with the stuff I have in it though.
Conclusion
If you are looking for a viable alternative to a backpack for landscape photography then I would thoroughly recommend giving the Camslinger a go. At under 40 euros it is great value and if you’re a street or casual photographer I’d say it’s a no brainer. Just remember, it’s for mirrorless users only 🙂
Tripods are probably my least favourite thing in photography. For me a tripod is a necessary evil, a piece of gear that needs setting up, wasting shooting time, and takes up valuable space and adds too much weight to my bag. Sometimes I wish I did’t need to carry a tripod at all and indeed sometimes I can go a whole day walking in the mountains and not use it once, yet there it is, on the side of my backpack weighing me down and making me resent it bitterly.
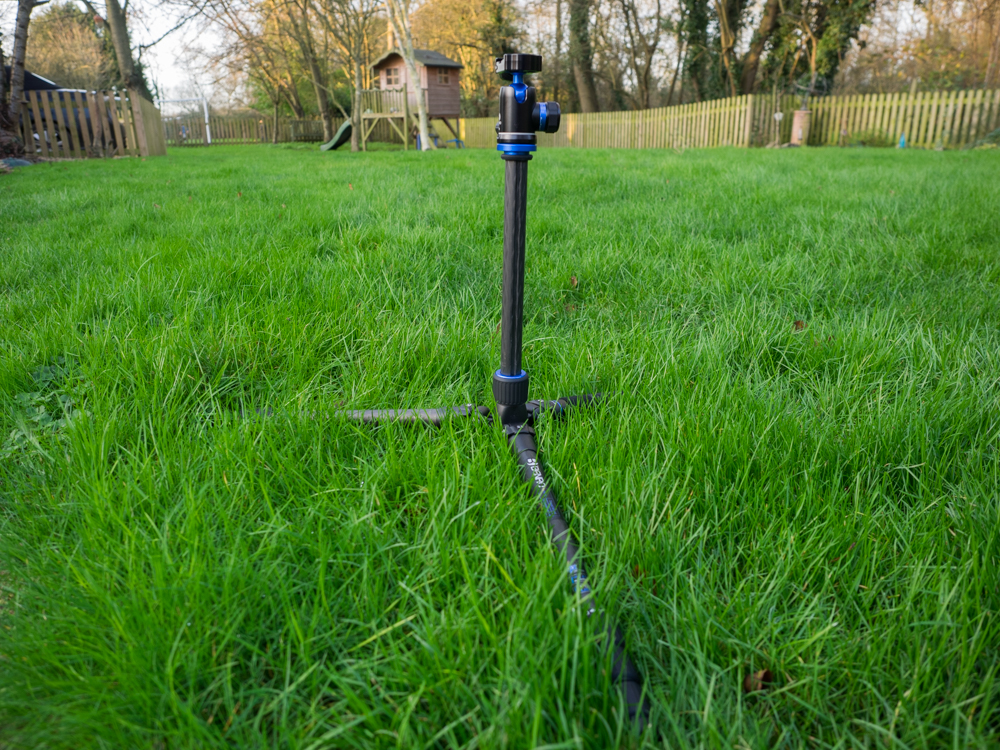
Of course, sometimes my tripod is my best friend and for that reason I always have one with me, but, I refuse to allow a tripod to take over and for that reason I only use travel tripods and my search for the perfect travel tripod has now brought me into a relationship with the Benro FTA18C Travel Angel. But, have I finally found my perfect partner? Well, before I answer that, let’s talk about the tripod itself.
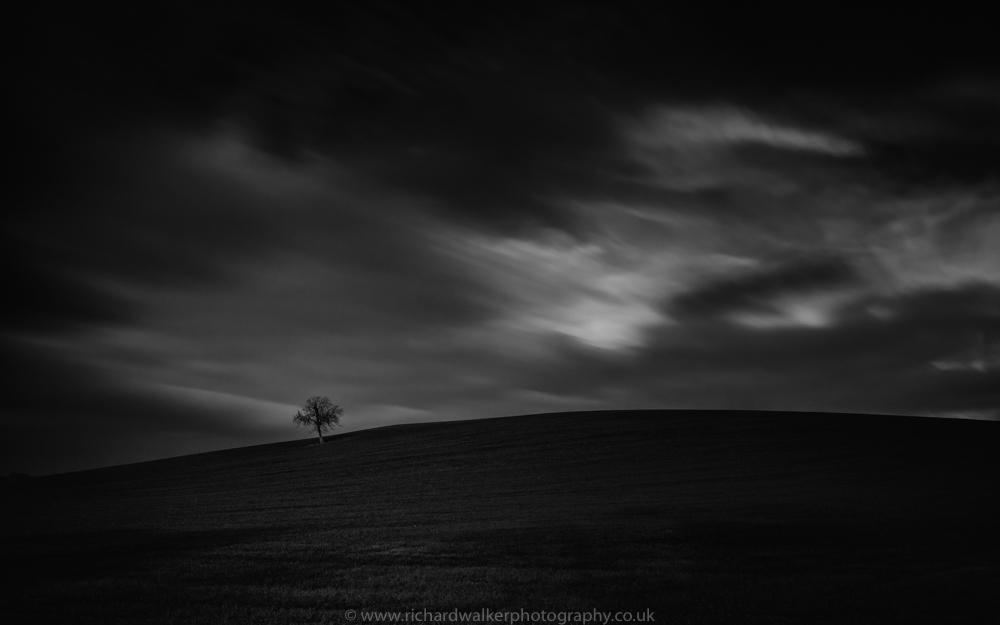
A 32 second exposure shot using the FTA18C Travel Angel on a gusty day proving it’s stability credentials. You can see how this shot was created and edited in the video below.
QUALITY
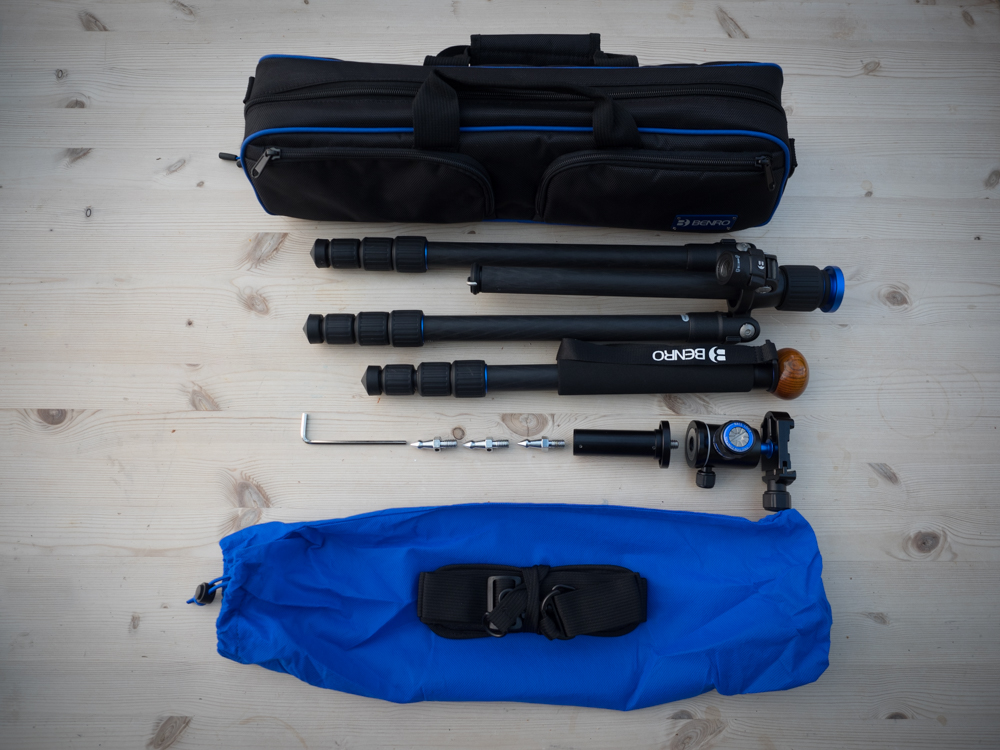
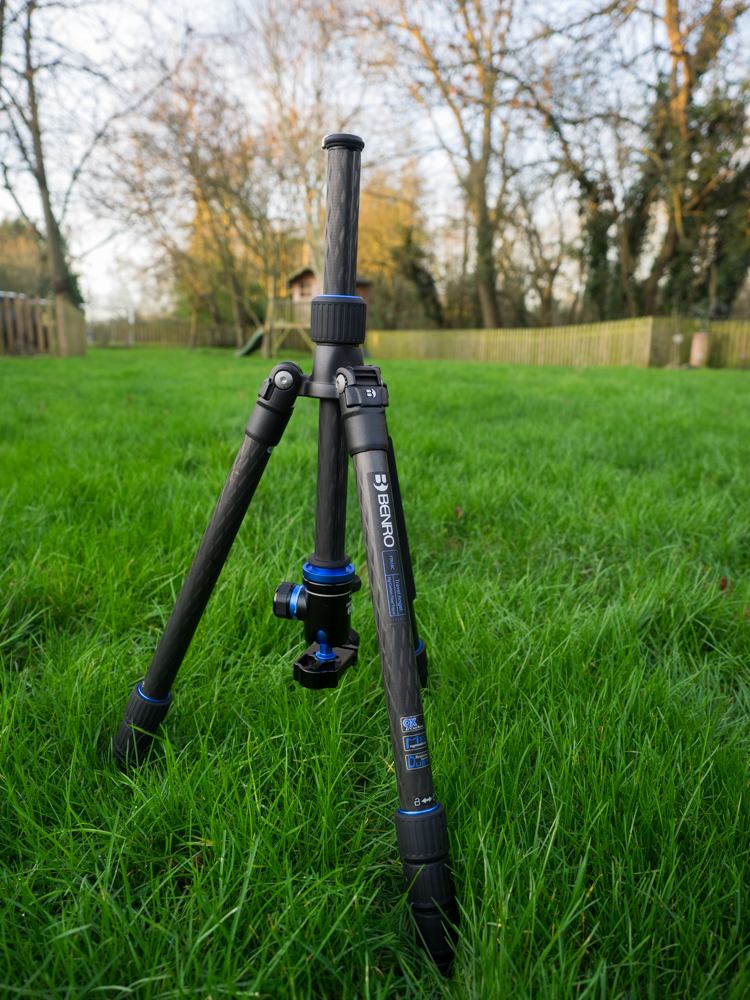
The first thing you notice when you unpack the FTA18C from the packaging is that it oozes quality. From the blue anodised finish on various parts through the magnesium castings to the sure feel of the twist locks this feels like a classy piece of gear. It comes in a bag that is inside another bag that has a detachable handle. That’s all I’m going to say about the bag(s). If you are the sort to carry your tripod in the bag it comes in then you now know it comes in a bag, 2 bags in fact. I, however, carry my tripod on the side of my backpack and therefore the bags will never be touched by me again.
The Travel Angel comes with not one but two bags, plus a few nice little extras
WEIGHT
Being a grumpy old curmudgeon who doesn’t want to carry a tripod this one feels like all others I have ever lifted, too heavy. However, pop it on the scales and the figures that pop up make a liar out of me. Weighing in at just 1.5kg complete with ball-head this is a light tripod thanks to its predominantly carbon fibre construction. Sure, I have owned lighter tripods such as the Sirui T-005BX that I have reviewed previously, but the thing is those lighter, smaller tripods are not proper tripods. What you gain in weight saving you lose in stability. The Sirui becomes pretty much useless in a bit of wind, something that is not the case with the Benro. Make no mistake, this is a proper tripod that can stand up to all but the strongest of winds and whilst it may feel too heavy to me when I pick it up, once it is attached to my backpack I don’t even notice it.
IN USE
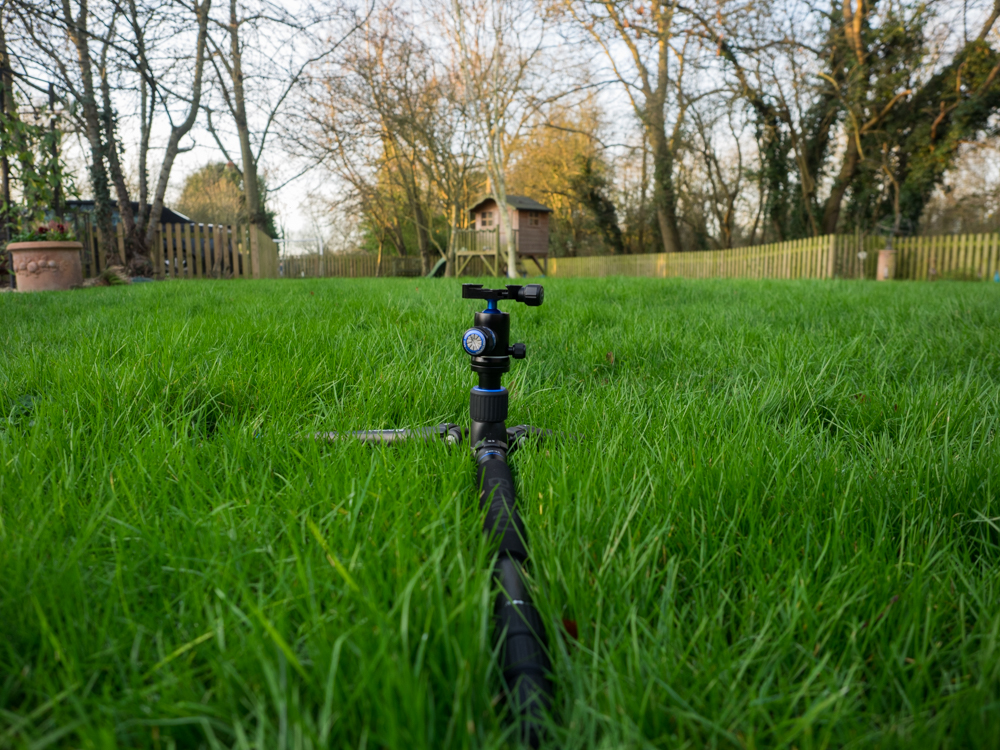
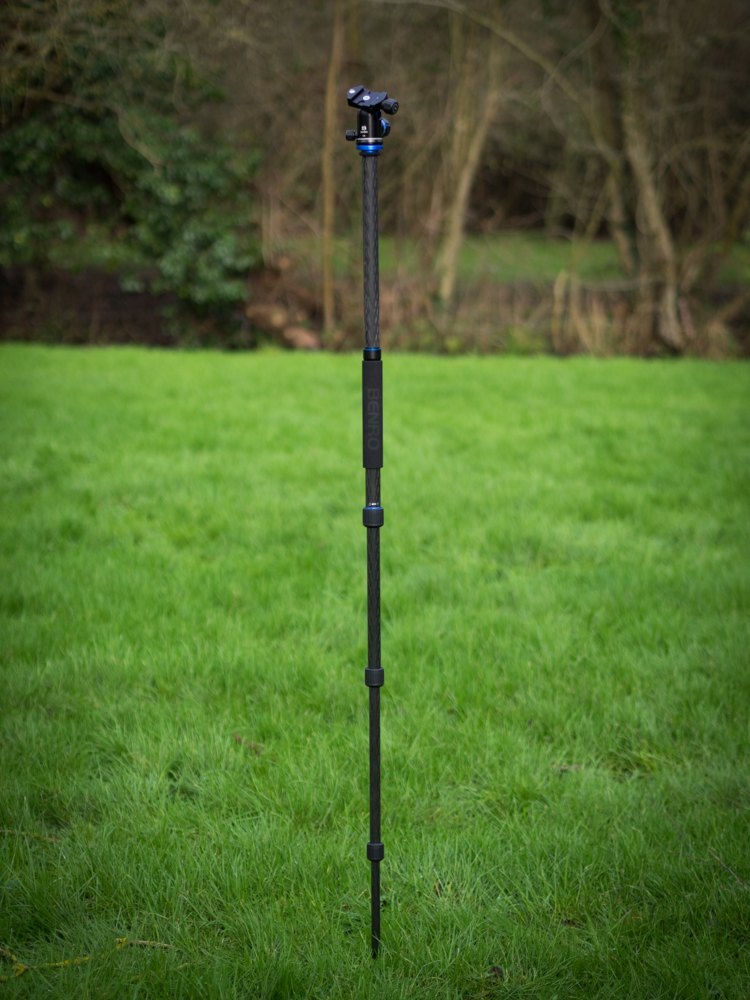
The FTA18C is simply a joy to use with a quality, reassuring feel and some nice features to make the tedious necessity of owning a tripod just that little bit more bearable. Thanks to the legs folding back on themselves 180 degrees it compacts down to just 44cm in length meaning that it will fit nicely in most photography backpacks. One small thing that is nice about this feature is when you swing the legs round and extend them the tripod is already at its maximum height of 154.5cm with the centre column already extended. Just pop your camera on top and even a six footer like myself is looking straight through the viewfinder without having to bend much at all. Even with the tripod in this fully extended position it feels stable and solid. The centre column is rigid and I could detect no lateral movement of the camera due to it being extended, but, if you do need to retract it this is achieved quickly and easily using a twist grip release and once retracted the tripod still stands at a very respectable 130cm.
The bottom of the centre pole features the obligatory spring loaded hook. Personally I simply do not understand the concept of these. I understand that the idea is you can hang a heavy weight on it such as your bag to aid stability in windy conditions, but I have never felt the need to use one and I can’t help thinking that if it’s windy your weight will blow around and cause more problems than it solves. Any, whatever the pros and cons, the Travel Angel has one if that is your thing.
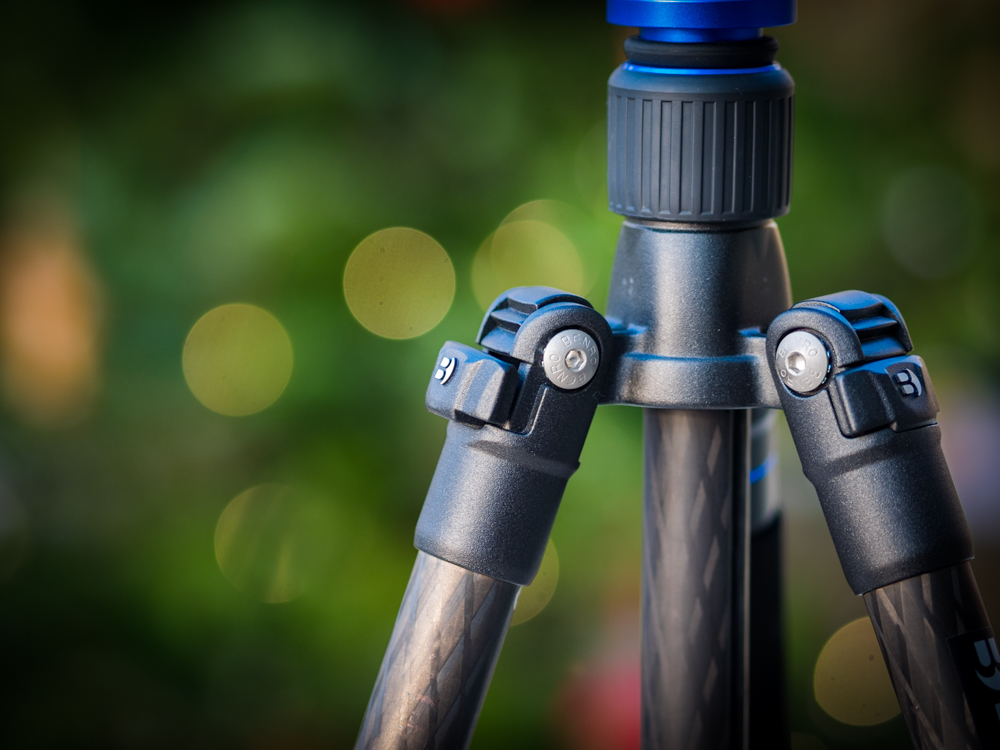
The catches that secure the legs in position are not spring loaded as on some tripods but I actually prefer this. What they are is very solid with a nice positive feel making it a breeze to lock the legs in one of the 3 offered positions.
The leg angle adjustment catches are not spring loaded but have a nice solid feel.
Leg height adjustment is done using dust and moisture resistant twist locks. Now, I know that these tend to polarise opinion, people either love them or loathe them but personally I love them and the ones that Benro employ on this particular model are the best I have used. The legs are 4 section units which means there are only 3 twist locks per leg and all the locks on each leg can easily be grasped in one hand to undo them. It only requires about half a turn before the leg sections extend with ease and tightening the locks again is easy as they don’t need doing up too tight to be secure.
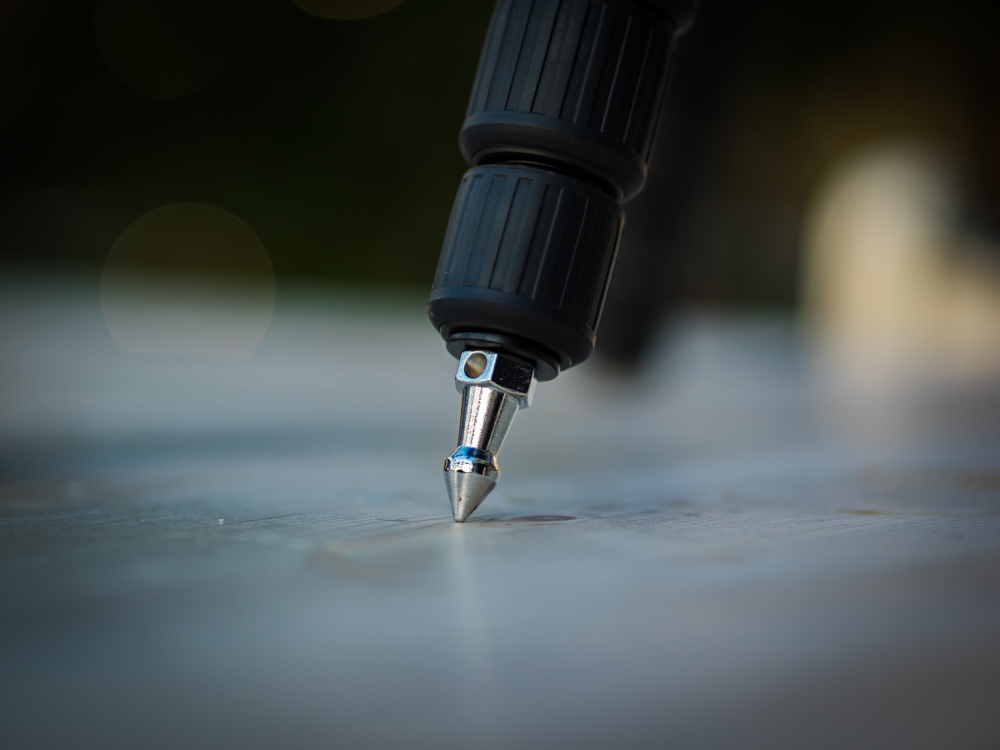
One nice touch is the ability to replace the standard rubber feet on the legs with some included metal spikes. I have taken advantage of this a couple of times now in windy situations and I have found it makes a real difference to the stability. As can be seen in the picture below the spikes have a nut on them to allow them to be tightened with a spanner. Interestingly Benro don’t supply a spanner but do supply an allen key which fits snuggly in the hole and works great for tightening them.
The ability to replace the rubber feet with metal spikes is a nice touch that pays dividends in difficult conditions.
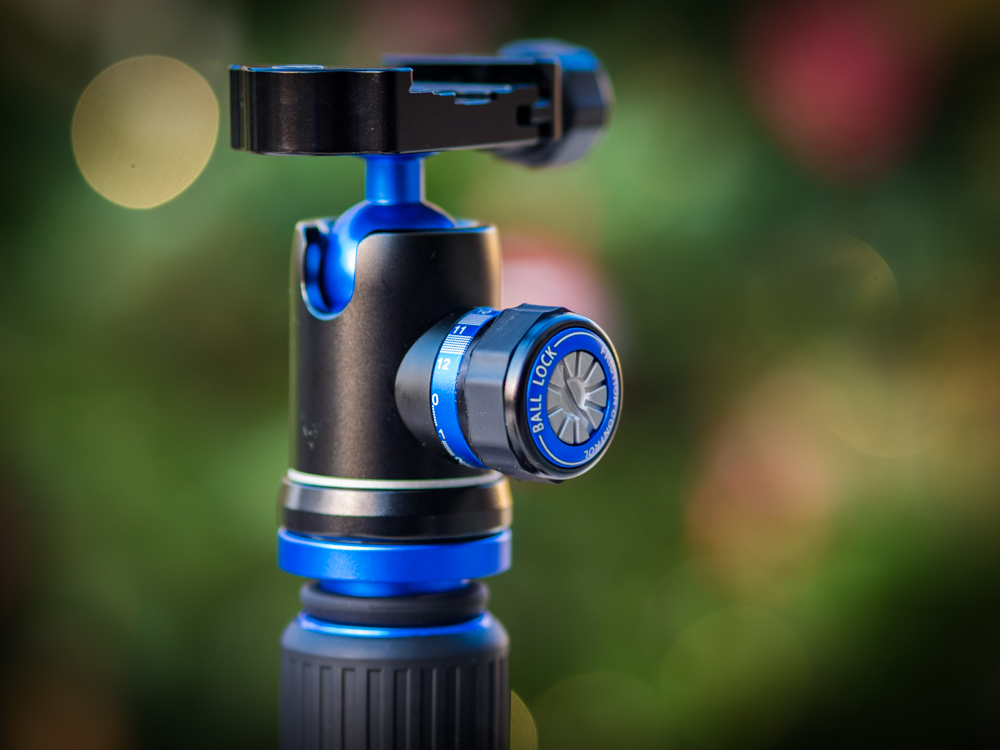
BALL HEAD
So far everything about the Benro Travel Angel has been positive, but as with any tripod it is only ever going to be as good as its ball head, so wouldn’t it be a pity if this crucial part let it down. Well, thankfully it doesn’t. The ball head on the FTA18C is equal to the rest of the tripod and performs well.
The unit as a whole is rated to hold up to 8kg which is a weight that I simply cannot test it to. My whole backpack complete with the tripod in it only weighs 6kg and the heaviest combination I could put together to put on the tripod was my OM-D E-M1 and 12-40 Pro lens which weighs in at less than a kilo combined. With this kit on the tripod the ball head is a pleasure to use. It uses an Arca Swiss style quick release plate which thankfully has a hoop on it for tightening, this is a big plus, too many manufacturers insist on forcing you to utilise a coin or allen key to attach the plate to your camera. This is a pain and Benro have quite rightly made things easy on this front. They have also employed a very nice safety mechanism when attaching the plate to the ball head which stops you accidentally loosening it enough to allow the camera to fall out. Another nice touch.
The ball head has just 2 knobs, a pan lock and a combined friction / ball lock control. Both have a nice positive feel and work well and the ball head itself has a nice fluid feel with a good range of movement. The friction / lock control has a nice feature which employs an inner adjuster which allows you to set the maximum it can “open” up meaning that when you unlock the ball you get a consistent feel every time and never get your camera flopping down because you have undone it too much. Another nice touch. Panning is smooth an the lock is quick and secure.
The ball head has some nice features and is smooth and fluid in it’s operation
SHOOTING LOW
Benro claim a minimum height of 44cm on their website. This is the height that the tripod stands at if you simply just put the legs at their widest angle, but there are a couple of ways you can go lower than this.
The first way is to remove the centre pole and use the included short centre pole. This reduces the height to 25cm. The second way is to reverse the centre pole and hang your camera upside down. Obviously this makes things a little more difficult for shooting but is certainly a viable alternative if you need to get really low.
With the standard centre column in the Travel Angel can go down to 44cm, but it has a couple of tricks to go lower.
Using the short centre column allows you to get down to 25cm
Reverse the centre column and you can go right down to ground level, but this does mean shooting upside down.
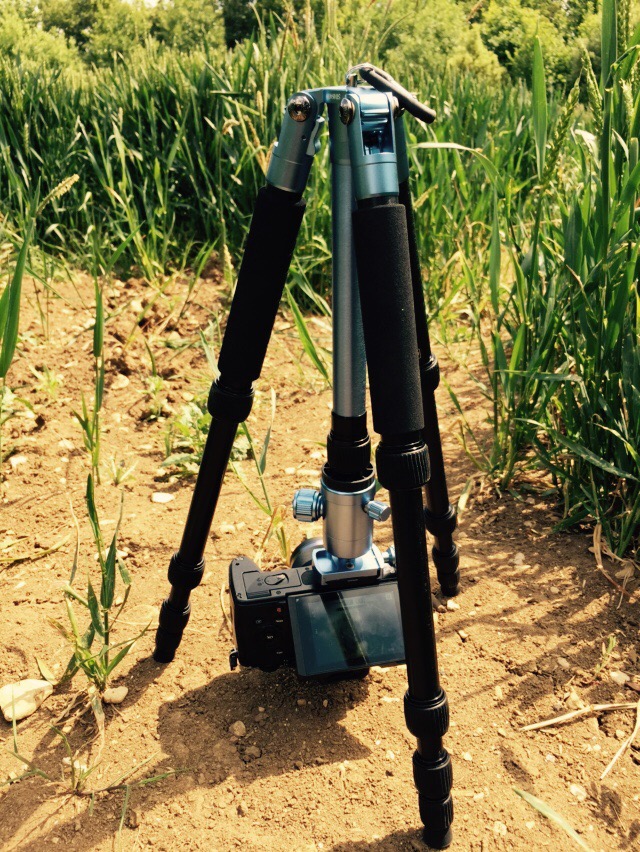
MONOPOD
If you are someone who uses a monopod then Benro give you an extremely competent one which is quick and easy to set up. Simply unscrew the designated leg, remove the centre column and screw the 2 together and hey presto, you have yourself a six foot monopod complete with ball head. I’m not a big user of monopods but I have given this a try and as well as being quick and easy to set up it makes for a very usable monopod.
The monopod is quick and easy to assemble
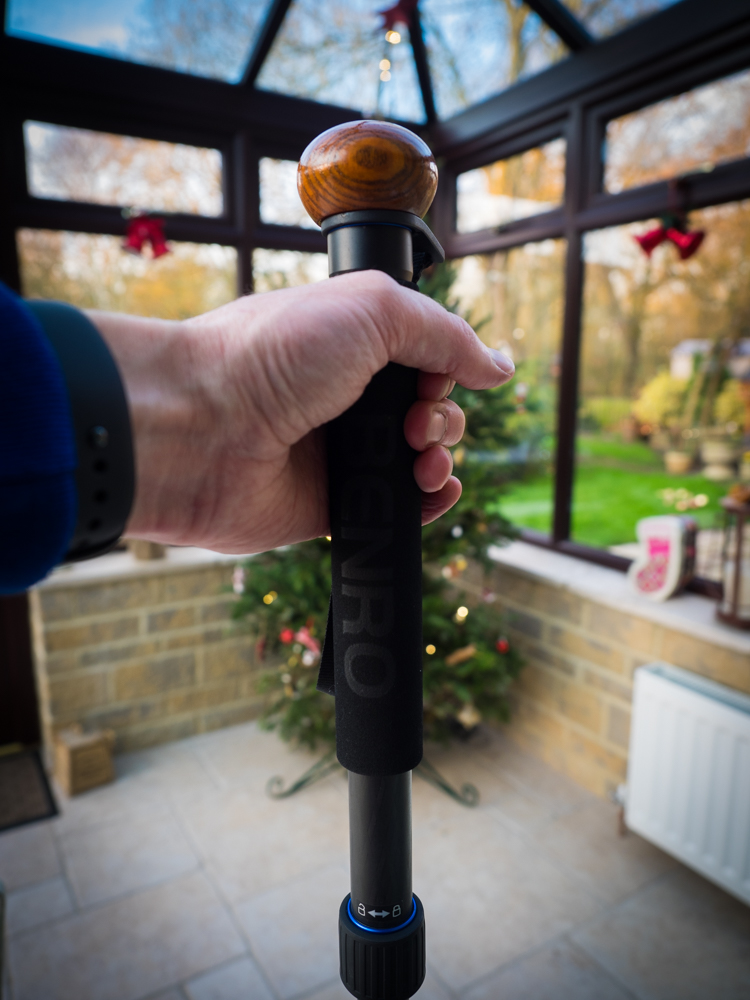
WALKING STICK
Ok, so far I have loved everything about this tripod but there was bound to be something that frustrated me and here it is. Benro have included a feature that is both excellent and frustrating in equal measure. With the inclusion of a simple wooden knob and a wrist strap that attaches to the top of the detachable leg Benro allow the user to create a walking stick / hiking pole. But here’s the thing, why just the one? Why not include 2 wooden knobs, 2 wrist straps and make 2 legs detachable? That way you have a really useful set of hiking poles rather than a pretty gimmicky walking stick. I do a lot of hiking, most landscape photographers do, and I have often wrestled with whether or not to purchase a set of hiking poles but I have always been put off by having to carry them, as well as all my photography gear, if I am not using them. So I have never made the purchase and my knees probably suffer as a result.
With a very simple change of design Benro can save my knees and ease the weight in my backpack whilst I hike. So come on Benro, if you change one thing on the next iteration of the Travel Angel please make it this. I’ll wager I won’t be the only one who finds this extremely useful.
The addition of a wooden knob and and wrist strap to make a walking stick are a nice touch but unless there are 2 it seems a little gimmicky to me
CONCLUSION
Minor gripe about the walking stick aside this is a superb tripod that has rightly taken pride of place in my backpack. At an RRP of £299 it gets the balance between cost, weight, stability, ease of use and quality pretty much spot on and with a 5 year warranty you should have nothing to worry about as long as the Benro customer service is good.
I’ve tried travelling with larger tripods and I’ve tried travelling with smaller ones and have never been completely satisfied, but with the Travel Angel Benro appear to have delivered almost everything I need and it will be quite a tripod that dislodges this one from my backpack. I just hope that it is the next iteration with 2 hiking sticks that eventually does, then I’ll be a very happy chap.
The Travel Angel has now taken pride of place in my backpack and it will take some dislodging.
It’s over a year now since I sold my Canon 5D MKII and all my lenses and took up photographic arms with the Olympus OM-D E-M1 and whilst I can’t put an exact figure on the weight saving that process garnered me, it is substantial, at least 2.5kg, and what’s more it has made everything easier in terms of handling my equipment. The camera swings over my shoulder better and is less strain on my neck and one of the first things I was able to do at the time was get a smaller backpack.
But, old habits die hard as they say and recently I found myself wondering 2 things. Firstly, why am I even carrying a backpack at all? Isn’t there a better bag I could be utilising? Well, more on that in part 2, but the other thing I have been contemplating was whether I needed to continue with the same tripod? You see when I moved to M4/3 it didn’t occur to me to re-evaluate my choice of tripod but over time it has dawned on me that a tripod and ball head that will take a 5D MKII and 70-200 lens may well be a little over the top for an OM-D E-M1 and the M.Zuiko 9-18mm, or even the 12-40mm for that matter.
The same desire to cut down on the amount of weight I carry around that led me to M4/3 in the first place has now led me to a smaller lighter tripod. This is one of the first shots I took with it. More at www.richardwalkerphotography.co.uk.
So, after much debate with myself and online research I jumped in with both feet and purchased a new, smaller, lighter tripod and ball head. I haven’t gone mad and spent a fortune to get the weight and size down, the new tripod cost £99 and if I am honest I haven’t so much jumped in with both feet as dipped a toe in the water as I still have my old tripod and head. But having initially dipped that toe in I am now well up to my waste as I haven’t used my old tripod at all since I got the new one. But more about the new one shortly, first let’s talk about the old one, my trusty Velbon Ultra REXi L with Manfrotto 496RC2 ball head.
Velbon Ultra REXi L
I purchased the Velbon a couple of years ago from a little shop in St. Ives, Cornwall after my piece of junk Manfrotto started to fall apart. It was the first tripod I had owned that used a twist operation to extend the legs and I quickly grew to like this way of doing things. Over the 2 years I have had no complaints about this tripod and ball head combination and it has served me well, but it is 45cm long when folded down and weighs 2.2kg. This is not too bad when carried on a backpack but it was just too heavy and unwieldy to carry in any other way such as in one’s hand for any longer than a few minutes and with me looking to move away from always being forced to take a backpack it was time to consider a change.
Less is more? The reduced bulk of the Sirius T-005X makes it much easier to carry around
The Sirius T-005X
My search for a replacement started with a very simple brief. Find a tripod that is lighter and small enough to negate the need for a backpack. A quick Google search presented me with the MeFoto Backpacker which had some really good reviews and was almost the one I went for until I happened across a review comparing it with the Sirius. The Sirius compared favourably and as it came in a few quid cheaper I decided to give it a whirl and I have to say that I haven’t been disappointed.
The first thing to say about the tripod is that it is very light, weighing in at bang on 1kg including the ball head it saves me another 1.2kg, which added to the 2.5kg saved on body and lenses gives a grand total of 3.7kg less for me to lug around. Believe me, this makes a huge difference. Just as importantly it collapses down to just 33cm including the ball head, whilst the Velbon can only cram itself into 45cm. This has made my tripod carrying life a whole lot nicer and I wouldn’t want to go back. But what about the drawbacks? How does it compare in use with the Velbon?
Whilst the Sirius can’t match the height of the Velbon it’s not too far in normal use although the Velbon does have another 27cm up it’s sleeve should the need arise. In reality in rarely does for me.
Well, the main thing is that it doesn’t go as high. The Velbon extends to the dizzying height of 1.70m when you raise the centre pole, although I rarely ever did this and usually had it at a height of around 143cm including the ball head.
The Sirius max’s out at around 123cm which is pretty impressive although due to it’s design this is reliant on the centre pole and this can certainly make it considerably less stable than the Velbon, especially in windy conditions. To try and counteract any stability issues the folks at Sirius have added a hook on which you can hang your bag or some other form of weight. The Velbon didn’t have this feature and although I have often heard people refer to this practice I have never tried it and I am somewhat sceptical as I can’t help thinking that if it is windy then your bag will blow around and cause vibration. Someone please let me know if I am missing something here but assuming that this is the gimmick I think it is then there is no doubt that the Sirius is less stable than the Velbon. This is compounded by the fact that the legs don’t spread as far in the standard position as well as the fact that the legs and centre pole are much smaller diameter.
Does any of this matter? Well, so far it hasn’t to me. Sure, I have to be a little more careful when setting it down on uneven ground but so far this slight trade-off has been well worth the weight saving and ease of carry. What’s more the Sirius holds the trump card for the situation that I more often find myself in, going low.
How Low Can You Go?
I actually don’t like shooting at eye level if I can avoid it. Sure, some of the time it’s what the scene dictates but if possible I like to shoot from a perspective that the viewer wouldn’t normally see and this invariably means going low and this is where the Sirius shines.
One thing that I struggled to find out when researching this tripod was whether the centre pole was detachable, so if you have stumbled across this blog post with that concern then let me put your mind at rest right now. The centre pole can indeed be detached and the ball head can be attached directly to the legs. This is superb and gets your camera to a height of just 12cm above the ground. This isn’t actually any lower than the Velbon can go as you can see below, however there is something that the Sirius can do that the Velbon can’t and it’s something I really rather like.
The Sirius and Velbon are will go down to almost identical heights but the Sirius has a trick up its sleeve that the Velbon lacks.
Because the Sirius has the ability to fold its legs back on itself it has the ability to hang your camera upside down for really low shots, much lower than the Velbon could ever hope to achieve. The only limiting factor in how low you can get your camera is how tall your camera is. The built in level on the E-M1 helps a lot here. With my old 5D MKII I would have been forced to have a hotshoe level attached meaning that the camera lens would have been further from the ground, but with the E-M1 you can simply tilt the screen up and use the built in level and if you don’t want to get down there at all you can simply fire up the wifi and use the remote app to control everything.
I’m looking forward to trying this setup for landscapes but I’d imagine it would also be pretty cool for macro shots.
The tilt-able touch screen on the E-M1 along with the built in level makes upside down shooting a breeze.
Conclusion
So, what’s my verdict? Am I glad I switched?
Yes, extremely. Whilst the Sirius inevitably has its drawbacks when compared to the Velbon it is replacing they are not deal breakers and are far out-weighed by the reduced bulk I need to carry and some great little features. The ball head is pretty good too. Is it better than the 496RC2? Well, that is subjective but you know what? I never liked to 496, and I do like the C-10X ball head that comes with the Sirius. It’s pretty smooth, locks well, pans well and has marks for panning. I wouldn’t recommend it for a DSLR but for M4/3 it’s great. The only thing letting it down is the lack of quick release for the plate and the fact that the plate has to be tightened to the camera with a coin. But this is an exercise in weight saving and a 5p doesn’t weigh much.
The main thing for me is that the Sirius fulfils my needs as a tripod whilst allowing me to do what I set out to do, junk my backpack in favour of a nice light-weight, over the shoulder (or even clipped to my belt) bag. I am now travelling light and can take the same equipment whether I am walking around town or hiking in the mountains and it never seems too much. More on the bag in part 2 but for now here’s another shot from the Sirius mounted E-M1.
A 73 second exposure shot using the Sirius T-005X. As you can see it’s pretty sharp so the tripod must have held firm throughout. More at www.richardwalkerphotography.co.uk.
My father-in-law. Shot in my kitchen with an OM-D E-M1 and Oly 45mm f1.8. f1.8 | 1/100 sec | ISO 800
Over the Christmas period I have had the opportunity to borrow David’s Oly 45mm f1.8. Up until now the only primes I had around this focal length were 2 old manual lenses that I got on eBay. More about these another time but whilst I love using them for the tactile nature of going manual (there’s no doubt that I feel more connected with the whole shooting process when using these), I find I do miss a lot of candid opportunities because despite some very good focus aids built into the OM-D E-M1 I simply miss focus, a lot.
Image Quality
Ok, let’s get the most important point out of the way. This lens, in my humble opinion, is stunning in terms of image quality. It is the best portrait lens I have ever used, and that includes the 70-200 MkII Canon. It is very sharp wide open (which let’s face it is where a lens like this will spend most of its time) and produces lovely out of focus backgrounds separating the subject from its surroundings beautifully.
Handling
This is a small lens which I personally like. The drawback is that it has a very unusual filter size which means you either need to get new filters or a step-down ring. That aside it looks fairly good on the camera and in auto focus mode it is lovely to use with extremely fast focusing. For manual use you have to jump into the menu and turn on manual focus as it doesn’t have the snap back ring that the pro Oly lenses sport. Personally I don’t much like using it for manual focus, it is just too small and simply doesn’t have a nice feel to it, but with such fast accurate auto focus I can’t see this ever being an issue.
I came across this fellow in the Lake District recently. f1.8 | 1/640 sec | ISO 200
Conclusion
There is no doubt that this is a lovely lens and with Amazon currently selling it at £179 it is an absolute bargain. I have had it in my basket several times as I know that I am going to lose this one as soon as David heads back off to the other side of the world. But the bottom line is, as much as I love it, I am not sure it is for me. If I were someone who shot a lot of portraits or did a lot of street I would have this lens for sure, but as a landscape photographer it is a luxury. For now I will continue to use my old manual 50mm for those sorts of shots but who knows, in the future I may just change my mind.
Dicki
My dog sits in this chair with his arm over the side looking like some old man all the time. It’s only this once that he has stuck his tongue out at the camera though. f1.8 | 1/125 sec | ISO 1600